
8 inch vs 10 inch Subwoofer For Home Theater
Do you know exactly what sort of sound you want to hear from your 8 inch vs 10 inch Subwoofer Home Theater? I think not. But I can tell you that having a clear bass can make your whole listening experience better, no matter what you have been playing. Having a subwoofer is important for that.
There are many things that determine how well subwoofers work, but one of the most significant is how big they are. Even though there are a lot of different sizes, the two most common subwoofer sizes that audiophiles choose are the 8 inch and 10 inch subwoofer.
What makes them unique? What makes some people choose one over the other? Keep reading to learn more!
What is a subwoofer, and why do you need it?
Bass is the main thing that a subwoofer is all about. At a frequency of 20 to 200 Hz, it's a loudspeaker that can make low sounds like bass or sub-bass. An air pump that has low-pressure power can be thought of as a big air pump that injects low bass frequencies, no matter what kind of music you're listening to or what kind of sound effects you hear in movies.
Subwoofers aren't very important now, because you already have a loudspeaker that can play the bass you need.
There are subwoofers that let you feel the bass instead of hearing it through bookshelf speakers. If you have a good subwoofer with your normal loudspeakers, it will make your whole sound system sound better, too. This will not only make your loudspeakers work less hard, but it will also add more width and depth to your sound stage.
Adding subwoofers to your sound system will make a big difference in how well your stereo imaging is done, how interesting the dynamics are, how vibrant and pleasant the sound is to the ears. Getting a subwoofer isn't going to make your music sound better, but it will make it sound better.
Choosing The Right Sized subwoofer:
Subwoofers are usually small boxes that really can fit under a table, but only by a very small amount. It usually has a driver (the part that makes the noise) inside, as well as an amplifier to power it. This will help the driver do its best work. In general, a 10-inch driver should have a good-sized box, while an 8-inch driver can have a small box.
In this case, the driver has to work very hard because bass waves are long, so you can't hear them at all. In one way, you can do this is by getting a bigger driver. A 12-inch driver is a common size, but you can also get 15-inch ones. Some subwoofers have more than 1 driver that can deliver accurate and precise bass response.
People can also have a lot of power. As the size of the driver and the cabinet shrink, the power needs to go way up just to make up for it. Even though an 8-inch sub in a tiny box could sound like a 10-inch sub in an even bigger box with much more power, this isn't true.
8-inch subwoofer:
If you want to improve your home's stereo system but don't have a lot of space, an 8-inch sub is the answer. Some 15- to 18-inch subwoofers are bigger and more powerful, but these smaller ones work just fine in smaller rooms. These small subwoofers, despite their compact size can deliver punchier bass. This is due to advanced and intelligent engineering methods. In addition, because 8-inch subwoofers are usually small and light, they can produce accurate bass.
Reasons to choose a 8-inch subwoofer
You can improve the bass of your music by adding more.
The most powerful 8-inch subwoofer would then make your music sound better than it would if you used the speakers only. They will make the low ends sound more powerful and impactful. An 8-inch sub will have more power and impact, no matter what.
Clean look:
Thin and sleek designs will give your room a clean look. If you like minimalist room decor, the 8" subwoofer is for you.
Great for compact spaces:
8" subwoofers have sleek and slim design. These low profile subwoofers are ideal for users who have space limitations. Some subwoofers can be place horizontally or vertically. Others can be easily placed under couch.
Power a 5-channel amplifier.
Small subwoofers can work well with a five-channel amplifier, even though they are small. The more powerful subs usually need their own Monoblock amplifier and a separate amplifier for the speakers, so they don't work together.
10-inch subwoofer:
10 inches is the second most popular size for subwoofers in the market, after 15 inches, which are the most popular. These are mostly known for being small and quick. It's easy to put in the 10-inch subwoofers, but they have a more powerful bass response and better sound quality than the 8-inch subwoofers. If you like metal, rock, or country music, these subwoofers could be the right choice for you.
Why a 10-inch subwoofer is better:
The bass has been made better:
Under 80 Hz, the subwoofers can playback sounds. This adds just the right amount of depth.
High-frequency performance has gotten better:
With the subwoofers, the tweeters and woofers can have the most midrange and high frequencies possible, so they can make the best sound.
The ease of instalment:
The 10-inch subwoofer is smaller than the other subwoofers. It's easy to set up because it's the same size all over.
A more mellow audio experience:
The subwoofers will give you rich and dynamic sound that won't change the sound.
8 inch vs 10 inch Subwoofer: What sets the subwoofers apart?
The main difference between the 8-inch subwoofer and the 10-inch subwoofer is how much bass they can make.
Because the 10 inch subwoofer is bigger, it can move more air than the 8 inch subwoofer can. This means that the 10 inch subwoofer is a lot louder than the one it is competing with. However, the 8 inch woofer is easier to set up because it is lighter than the 10 inch woofer.
Another thing that is affected by the size of the subwoofer is how good the sound is going to be. Most of the time, smaller subwoofers are better at controlling fast, tight bass notes than bigger ones. This is why the 8-inch woofer gets points.
Let's get into a more in-depth comparison.
Voice Coil Diameter:
8 and 10 inch subwoofers usually have different sized voice coils. An amplifier sends power to the voice coil, which is made of metal wire. This wire sends that power to an electromagnetic field that moves the driver forwards and back.
Size of the voice coil is often linked to how much power it can handle. As a rule, you should pay more attention to the power handling and low frequency performance expressed in hertz than speaker size.
Frequency Extension:
Hertz are used to measure low frequency extension, and you want to find the lowest number possible. As an example, when a subwoofer goes down to 18 hertz, it makes more low-visceral bass than when it goes down to 22 hertz, which makes it sound more "rough." This is true no matter how big the cone is.
Driver size isn't always as important as enclosure size in this case because of how speakers work inside of them. Larger enclosures are usually better at extending low frequencies, but smaller enclosures save space but cut down on extension. You can look at the sub's documentation to find out what kind of enclosure it was made for.
Excursion:
The more power the subwoofer could handle, the farther the driver can move. This is called excursion. This, in turn, means how much bass energy the subwoofer can make. As a result, the farther a speaker moves, the more air it moves.
This means that the bass is lower and more powerful. In theory, if there are two identically built 8-inch and 10-inch subwoofers, the 10-inch one should move more air. Due to their weaker suspensions and materials, less powerful subwoofers usually have less excursion.
Room Size:
Subwoofer and room size relationship is quite important to understand. In a home audio or theatre setting, the size of the room is very important.
If the sub is too small, you don't hear much bass. Too big a subwoofer could cost you money or make it hard to place. Between an 8-inch subwoofer and a 10-inch subwoofer, these things aren't big enough to make a big difference. However, if you add a second subwoofer of the same size to a room that is more than 3,000 square feet, the natural peaks and valleys in bass response are less noticeable.
Top 10 inch Subwoofers:
We have picked out the best 10 inch subwoofers in 2024 for you.
Yamaha 10″ 100W Powered Subwoofer
It is safe to say that Yamaha's 10" Powered Subwoofer is another one of their many successful products. A multitude of cutting-edge technologies, like Twisted Flare ports, YST II, a built-in amplifier, and more make it possible for it to function admirably even with a 100-watt input. Because of this, its output is full of character and extremely punchy, which is exactly what a decent bass should sound like.
The Yamaha 10′′ 100W Powered Subwoofer is capable of producing bass output as low as 25 Hz, despite its modest power level. Also, the Yamaha 10′′ 100W Powered Subwoofer has a 180 Hz maximum frequency response. The design of this subwoofer is basic yet attractive, unlike most other subwoofers.

If your stereo system or home theater sound is missing that oomph, then the Yamaha NS-SW100 subwoofer is best for you. With a 10” driver, it will deliver tighter bass in small or compact spaces. It uses YST II technology in order to deliver rich and pure low ends. Yamaha uses every technique to achieve the best bass possible from a subwoofer of this size.
Our Verdict
Yamaha NS-SW100 is a budget-friendly subwoofer that delivers deep and clean bass. The user manual comes with detailed images and instructions of connection, setup, and positioning. The low ends are impactful and shows its presence in movies, music and games. Action and shooting scenes are intense. It is better to understand the subwoofer size and room size relationship. So, make sure not to place it in large rooms and choose the correct size in order to enjoy appropriate sound.
PROS
- Mid-sized woofer driver,
- Deep and articulate bass
- Uses advanced technology
- Simple and easy setup
- Good built
CONS
- No auto standby mode

GENERAL:
| Subwoofer for Home Audio | Yes |
| Subwoofer Type | Powered Subwoofer |
| Subwoofer Variation | Ported Subwoofer |
| Woofer Size (inches) | 10 inches |
| Best Usage: | Medium Room |
| Amplifier Power Rating | 100W |
| Enclosure | Bass Reflex |
Audio Specifications
| Power Handling(Peak): | 100W |
| Power Handling(RMS): | 50W |
| Frequency Response: | 25–180 Hz |
| Low Frequency Response: | n/a |
| Nominal Impedance: | 5 ohms |
| Sensitivity: | n/a |
Connectivity:
| RCA stereo line level inputs (pair): | N/A |
| RCA Output: | |
| RCA LFE Input: | N/A |
| XLR Outputs (pair): | |
| XLR Inputs (pair): | |
| Speaker level input (pair): | |
| Speaker Level Output (pair): | |
| Wireless: | N/A |
| Connector Type: | RCA input |
Drivers:
| Woofer Quantity: | 1 |
| Woofer Size: | 10-Inches |
| Woofer Composition: | foam or rubber |
| Firing Direction: | front-Firing Subwoofers |
| Enclosure: | Ported |
| Amplifier Class: | Class D |
| Amplifier Output (watts): | 100 |
Audio Quality ( Tested ):
| Bass Extension: | Decent and average that goes as low as 28 Hz |
| Bass Accuracy: | Tight, clean bass that packs a punch |
| Dynamic Range: | Good dynamic range |
| Power Handling: | Moderately good in terms of power |
| Frequency Response: | Wide frequency response |
| Transient Response: | Quick transient response |
| Overall Performance: | great value for money |
Control:
| Low-Pass Crossover Freq: | n/a |
| High-Pass Crossover Freq: | n/a |
| Phase Switch: | N/A |
| App Control: | N/A |
| Remote: | N/A |
Physical Specs:
| Height: | 13.875 |
| Width: | 13.875 |
| Depth: | 16.125 |
| Weight: | 26.5 lbs |
| Enclosure: | Ported |
| Grille: | available |
| Moisture Resistancy: | n/a |
| Cabinet Material: | MDF |
| Color Variation | Black, Walnut, White |
IN THE BOX:
| Accessories: | Subwoofer, manual, cable, warranty card, product guide |
| User manual: | Yes |
| Warranty: | 1 year |
Rating System:
| Bass Extension: | 4.2 |
| Bass Accuracy: | 4.32 |
| Dynamic Range: | 4.02 |
| Features: | 4.13 |
| Build Quality: | 4.04 |
| Fit and Finish: | 4.03 |
Sony SACS9 10-Inch Active Subwoofer
The Sony SACS9 is an active subwoofer with 115 watts of power and a frequency range of 28 Hz to 200 Hz, making it ideal for a wide range of applications. As a result, the Sony SACS9 is a great choice for listening to high-quality music.
Next, let's talk about the Sony SACS9's build quality. It has foamed mica cellular woofers that are reinforced to keep sound from leaking out at all times. The speaker and line-level inputs on the unit can be used to connect it to home theatre systems. Subwoofer: You will also get RCA cables and detailed instructions on how to set up the subwoofer.

GENERAL:
| Subwoofer for Home Audio | Yes |
| Subwoofer Type | Powered Subwoofer |
| Subwoofer Variation | Ported Subwoofer |
| Woofer Size (inches) | 10 inches |
| Best Usage: | Medium Room |
| Amplifier Power Rating | 115 W |
| Enclosure | Bass Reflex |
Audio Specifications
| Power Handling(Peak): | 200 W |
| Power Handling(RMS): | 115 W |
| Frequency Response: | 28–200 Hz |
| Low Frequency Response: | 28 Hz |
| Nominal Impedance: | n/a |
| Sensitivity: | n/a |
Connectivity:
| RCA stereo line level inputs (pair): | Yes |
| RCA Output: | |
| RCA LFE Input: | Yes |
| XLR Outputs (pair): | N/A |
| XLR Inputs (pair): | N/A |
| Speaker level input (pair): | N/A |
| Speaker Level Output (pair): | Yes |
| Wireless: | N/A |
| Connector Type: | RCA, spring clips |
Drivers:
| Woofer Quantity: | 1 |
| Woofer Size: | 10-Inches |
| Woofer Composition: | mica reinforced cellular woofer |
| Firing Direction: | front-Firing Subwoofers |
| Enclosure: | Ported |
| Amplifier Class: | not specified |
| Amplifier Output (watts): | 115 W |
Audio Quality ( Tested ):
| Bass Extension: | good bass extension but not outstanding |
| Bass Accuracy: | strong low end performance |
| Dynamic Range: | decent dynamic range |
| Power Handling: | powerful enough for music and movies |
| Frequency Response: | frequency response is wide but there are subwoofers with wider response |
| Transient Response: | Decent transient response |
| Overall Performance: | great value for money |
Control:
| Low-Pass Crossover Freq: | 50-200 Hz |
| High-Pass Crossover Freq: | n/a |
| Phase Switch: | Yes |
| App Control: | N/A |
| Remote: | N/A |
Physical Specs:
| Height: | 13.58 |
| Width: | 11.61 |
| Depth: | 15.75 |
| Weight: | 25.35 lbs |
| Enclosure: | Ported |
| Grille: | magnetic cloth grille |
| Moisture Resistancy: | n/a |
| Cabinet Material: | |
| Color Variation |
IN THE BOX:
| Accessories: | 1 subwoofer, RCA cord, Instruction manual |
| User manual: | Yes |
| Warranty: | 1 year |
Rating System:
| Bass Extension: | 4.34 |
| Bass Accuracy: | 4.51 |
| Dynamic Range: | 4.42 |
| Features: | 4.43 |
| Build Quality: | 4.35 |
| Fit and Finish: | 4.35 |
Klipsch R-100SW 10″ Subwoofer:
The Klipsch R-100SW subwoofer has 300 watts of power, which is roughly three times as much as the Klipsch R-100. Despite its high price tag, it has a frequency range as low as 32 Hz, which is ideal for producing deep bass. Copper IMG woofer is used in the subwoofer, which has a front-firing design. Allows it to run at 300 watts peak capacity thanks to an all-digital amplifier integrated in.
Low pass crossover and phase adjustment are also included in this subwoofer's features. The LFE RCA ports on the back of the device must be used for input. As a result, the receivers may be used with a wider range of audio equipment. Subwoofers are activated automatically when playback begins if they are linked to an audio system. In addition, Klipsch offers a 5-year warranty.

GENERAL:
| Subwoofer for Home Audio | Yes |
| Subwoofer Type | Powered Subwoofer |
| Subwoofer Variation | Ported Subwoofer |
| Woofer Size (inches) | 10 inches |
| Best Usage: | Small Room |
| Amplifier Power Rating | 150 watts continuous (300 watts peak) |
| Enclosure | Bass Reflex |
Audio Specifications
| Power Handling(Peak): | 300 Watts |
| Power Handling(RMS): | 150 Watts |
| Frequency Response: | 32Hz - 120Hz (+/-3dB) |
| Low Frequency Response: | none |
| Nominal Impedance: | none |
| Sensitivity: | none |
Connectivity:
| RCA stereo line level inputs (pair): | Yes |
| RCA Output: | N/A |
| RCA LFE Input: | N/A |
| XLR Outputs (pair): | |
| XLR Inputs (pair): | |
| Speaker level input (pair): | |
| Speaker Level Output (pair): | |
| Wireless: | Yes |
| Connector Type: | L/R line-level/LFE RCA jacks |
Drivers:
| Woofer Quantity: | 1 |
| Woofer Size: | 10-Inches |
| Woofer Composition: | Spun-copper IMG (Injection Molded Graphite) woofer |
| Firing Direction: | front-Firing Subwoofers |
| Enclosure: | Ported |
| Amplifier Class: | All Digital |
| Amplifier Output (watts): | 150 |
Audio Quality ( Tested ):
| Bass Extension: | Great bass extension, punchy bass sounds down to 32 Hz |
| Bass Accuracy: | Excellent bass accuracy, deeper lows seamlessly blend with existing audio setup |
| Dynamic Range: | N/A |
| Power Handling: | Good power handling capability |
| Frequency Response: | 32Hz - 120Hz |
| Transient Response: | N/A |
| Overall Performance: | Impressive, best for home theater |
Control:
| Low-Pass Crossover Freq: | 40Hz-120Hz |
| High-Pass Crossover Freq: | none |
| Phase Switch: | Yes |
| App Control: | N/A |
| Remote: | N/A |
Physical Specs:
| Height: | 14-5/8 |
| Width: | 12-9/16 |
| Depth: | 18-1/16 |
| Weight: | 26.00 lbs |
| Enclosure: | Bass reflex |
| Grille: | Detachable |
| Moisture Resistancy: | none |
| Cabinet Material: | MDF (Medium-Density Fiberboard) and rigid material |
| Color Variation | Black |
IN THE BOX:
| Accessories: | Powered sub grille (installed), 6.5' AC power cord, safety instructions, warranty information |
| User manual: | Yes |
| Warranty: | 5 years woofer, 2 years amplifier |
Rating System:
| Bass Extension: | 4.6 |
| Bass Accuracy: | 4.5 |
| Dynamic Range: | 4.7 |
| Features: | 4.5 |
| Build Quality: | 4.75 |
| Fit and Finish: | 4.75 |
Top 8 inch Subwoofers:
We have chosen the best 8-inch subwoofers for you, so you don't have to.
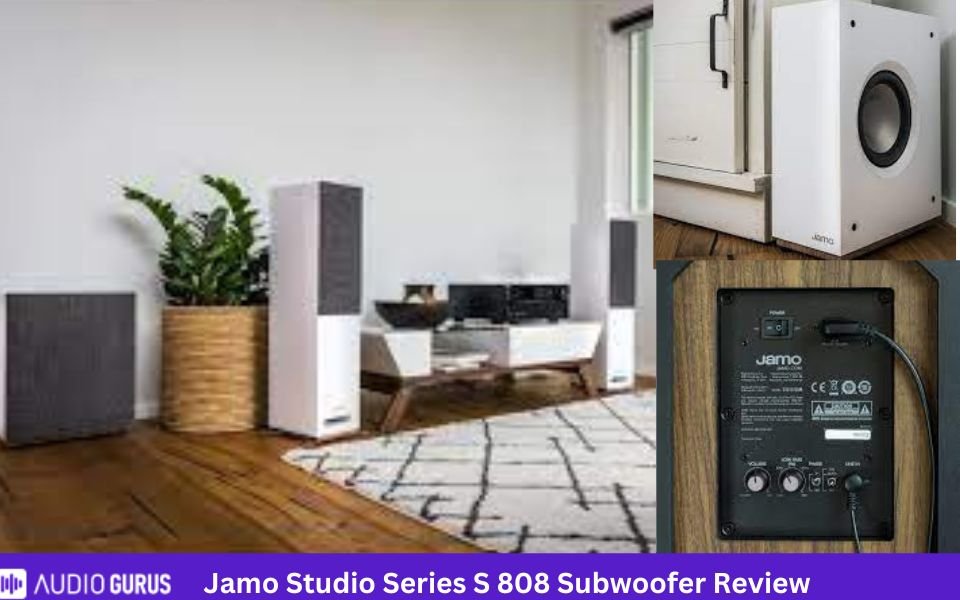
Jamo Studio Series S 808 subwoofer:
The Jamo S 808 8” is an impressive subwoofer available at a cheap price. With a sleek design and flexible placement, the sub can be hidden even under the couch. It delivers clean, articulate and tight bass. This subwoofer model is perfect for compact spaces. It will give the adequate punch without breaking your bank. The sub also comes with easy connection method and phase switch.
GENERAL:
| Subwoofer for Home Audio | Yes |
| Subwoofer Type | Powered Subwoofer |
| Subwoofer Variation | Ported Subwoofer |
| Woofer Size (inches) | 8 inches |
| Best Usage: | Small Room |
| Amplifier Power Rating | 100W |
| Enclosure | Bass Reflex |
Audio Specifications
| Power Handling(Peak): | 100 W |
| Power Handling(RMS): | 50 W |
| Frequency Response: | 39Hz - 180Hz |
| Low Frequency Response: | 39 Hz |
| Nominal Impedance: | n/a |
| Sensitivity: | n/a |
Connectivity:
| RCA stereo line level inputs (pair): | Yes |
| RCA Output: | N/A |
| RCA LFE Input: | Yes |
| XLR Outputs (pair): | N/A |
| XLR Inputs (pair): | N/A |
| Speaker level input (pair): | N/A |
| Speaker Level Output (pair): | N/A |
| Wireless: | N/A |
| Connector Type: | mono RCA |
Drivers:
| Woofer Quantity: | 1 |
| Woofer Size: | 8-Inches |
| Woofer Composition: | polyfiber woofer |
| Firing Direction: | front-Firing Subwoofers |
| Enclosure: | Ported |
| Amplifier Class: | Class D |
| Amplifier Output (watts): | 100 |
Audio Quality ( Tested ):
| Bass Extension: | good bass extension that goes as low as 39 Hz. |
| Bass Accuracy: | Deep bass that packs a punch in compact spaces |
| Dynamic Range: | decent dynamic range |
| Power Handling: | Moderately good in terms of power |
| Frequency Response: | Wide frequency response |
| Transient Response: | Quick transient response |
| Overall Performance: | Performance exceeds the price |
Control:
| Low-Pass Crossover Freq: | 80-120 Hz |
| High-Pass Crossover Freq: | n/a |
| Phase Switch: | Yes |
| App Control: | N/A |
| Remote: | N/A |
Physical Specs:
| Height: | 18 |
| Width: | 6.9 |
| Depth: | 13.9 |
| Weight: | 19 lbs |
| Enclosure: | Bass Reflex via slot port |
| Grille: | yes |
| Moisture Resistancy: | n/a |
| Cabinet Material: | not specified |
| Color Variation | Black , Walnut, White |
IN THE BOX:
| Accessories: | 1 powered subwoofer, Grille, Mono-RCA cable, Rubber feet, User Manual, Instructions, Warranty Information |
| User manual: | Yes |
| Warranty: | 2 years |
Rating System:
| Bass Extension: | 4.36 |
| Bass Accuracy: | 4.55 |
| Dynamic Range: | 4.3 |
| Features: | 4.46 |
| Build Quality: | 4.34 |
| Fit and Finish: | 4.3 |
SVS 3000 Micro Sealed Subwoofer:
The SVS 3000 Micro Sealed Subwoofer is the best for audio enthusiasts who want quality sound. You need to have a good budget because the subwoofer is quite costly. It will fit into tight spaces. The subwoofer produces bigger bass compared to its size. Unlike others, it has 2 8” woofer drivers that are responsible for producing accurate bass. Tweaking or adjusting the sound is much easier with multiple settings and app.

GENERAL:
| Subwoofer for Home Audio | Yes |
| Subwoofer Type | Powered Subwoofer |
| Subwoofer Variation | Sealed Cabinet Subwoofer |
| Woofer Size (inches) | 8 inches |
| Best Usage: | Medium Room |
| Amplifier Power Rating | 2500W |
| Enclosure | Sealed |
Audio Specifications
| Power Handling(Peak): | 2500W |
| Power Handling(RMS): | 800W |
| Frequency Response: | 23Hz to 240Hz +/-3dB |
| Low Frequency Response: | 30Hz – 200Hz |
| Nominal Impedance: | 16 ohms |
| Sensitivity: | n/a |
Connectivity:
| RCA stereo line level inputs (pair): | Yes |
| RCA Output: | N/A |
| RCA LFE Input: | Yes |
| XLR Outputs (pair): | N/A |
| XLR Inputs (pair): | N/A |
| Speaker level input (pair): | N/A |
| Speaker Level Output (pair): | N/A |
| Wireless: | N/A |
| Connector Type: | RCA |
Drivers:
| Woofer Quantity: | 2 |
| Woofer Size: | 8-Inches |
| Woofer Composition: | aluminum with injection-molded NBR |
| Firing Direction: | Side-firing |
| Enclosure: | Sealed |
| Amplifier Class: | Class D |
| Amplifier Output (watts): | 2500 W |
Audio Quality ( Tested ):
| Bass Extension: | Powerful and thunderous bass |
| Bass Accuracy: | Precise, tight and accurate bass |
| Dynamic Range: | very good dynamic range |
| Power Handling: | quite powerful compared to its size |
| Frequency Response: | Wide frequency response |
| Transient Response: | Decent transient response |
| Overall Performance: | amazing and powerful performance |
Control:
| Low-Pass Crossover Freq: | 30-200 Hz |
| High-Pass Crossover Freq: | n/a |
| Phase Switch: | Yes |
| App Control: | Yes |
| Remote: | N/A |
Physical Specs:
| Height: | 10.9 |
| Width: | 11.7 |
| Depth: | 10.7 |
| Weight: | 22.5 lbs |
| Enclosure: | Sealed |
| Grille: | yes |
| Moisture Resistancy: | n/a |
| Cabinet Material: | MDF |
| Color Variation | Piano Gloss Black and Piano Gloss White |
IN THE BOX:
| Accessories: | 1 Powered subwoofer, power cord, Quick Start Guide, SVS Brochure |
| User manual: | Yes |
| Warranty: | 5 years |
Rating System:
| Bass Extension: | 4.4 |
| Bass Accuracy: | 4.36 |
| Dynamic Range: | 4.26 |
| Features: | 4.3 |
| Build Quality: | 4.26 |
| Fit and Finish: | 4.25 |
More About Subwoofer:
The basic difference between a woofer and a subwoofer?
This is the first thing that makes them different. The woofer can go from 20Hz to 2kHz, but a subwoofer is better and can go from 20Hz to 200Hz.
Because subwoofers have a lower frequency range than woofers, they are usually bigger in size. In order to get the deep bass, you need more space for the driver to move so that it can do its job.
Finally, subwoofers are more specialized than woofers. There's no doubt that woofers are great. They do the job. But if you're an audiophile who always wants the best sound, subwoofers are there to help you get the best out of your music. Take a look at the Details Guide on the Woofer and the Subwoofer to learn more about these two things.
Types of subwoofers?
It's possible to divide subwoofers into two groups: passive ones and ones that are powered or have a lot of power.
Passive Subwoofer:
These subwoofers need to be powered by a separate amplifier or Audio/Video receiver in order to work. This makes them similar to people who speak. There are passive subwoofers that need more power to make low-frequency sounds, so the amplifier or receiver needs to be strong enough to keep up with them. The size of the room and the subwoofer speaker will decide how much power is needed.
Active or Powered Subwoofer:
The active subwoofers are all on their own. This indicates that both the subwoofer speaker as well as the amplifier are in the same cabinet together. This type of subwoofer doesn't need a power source from outside the house.
Because powered subwoofers are so easy to use, they are more popular than other types of subwoofers. As a result, the amplifier that is needed to run a passive subwoofer can cost more than the subwoofer itself. So, active or powered subwoofers are better.
What about the EQ?
EQ processing is built into certain subwoofers and many receivers. These devices play test tones through your speakers and subwoofer and then create a setting for your room that fits your speakers and subwoofer best. Some of these can do a lot to help cut down on the frequency response's peaks (over-accentuated notes).
Because the room acoustics are making it hard to hear certain frequencies, they can't fill in the gaps that they can't reach. These things aren't magic. In this case, they can't make a cheap, low-powered sub sound like a high-powered one. They can't make up for poor sub placement, either. But they do help. If you have the chance, you should look into them if you have the chance.
Having good bass vs. more bass:
A good subwoofer, when placed correctly in a room, can make deep sounds that sound real, not just the thump-thump. With any speaker system, the goal is to accurately reproduce all frequencies in the audio spectrum so that they sound the same to everyone. A boom sound isn't made by the best subwoofers. They make more bass than small speakers can, which makes them better. Good bass isn't always more bass, but better sound quality. This will give you a more realistic sound picture of what's in the music or movie. If you want to add more bass than that, you can certainly turn it up. The important thing is that you don't have to.
The problem is that specs alone can't tell a good subwoofer from a bad one. If you buy an 8-inch, 100-watt sub, it might sound good, but if you buy a 10-inch, 500-watt sub, it might sound bad. In this case, reviews are very important, and you should try to find them.
So there isn't a rule like "10-inch 100-watts for 'X'-size room," but in general, bigger, more powerful subs will work better even in smaller rooms. In a big room, or one that's open to the rest of your house, a 10-inch, 100-watt sub won't be enough. As a rule of thumb, 10-inch, 100-watt subs are the minimum. Keep an eye out for subs with less than 100 watts. If the driver is smaller, you'll need a lot more power to get the same sound. It's true that there are some exceptions, but this should give you a good place to start.
Final thoughts:
If you're an audiophile who likes a lot of bass, you always look for the best subwoofers on the market, like this one. With so many different features, it's hard to figure out which subwoofer can hit you with the right thump.
If you like a lot of bass in your music, you should get a subwoofer that is the right size for you. If you like to listen to rock, country, and metal music, the 8 inch subwoofers are a good choice. On the other hand, if you like to dance to party music, the 10 inch subwoofers can give you just the right amount of bass to get your feet moving.
There are a lot of other things to think about, too, not just the size of the subwoofer, when it comes to how well it works. You should look at the subwoofers, listen to them, and then choose one that you think is right for you.
Well, this faq is here to solve some of your problems that may arise while walking in the pavement of best subwoofer.
Is an 8 inch subwoofer enough?
An 8-inch "The subwoofer is going to give you tight, clean bass that you can listen to all the time. It's possible to find 8-inch subwoofers that sound great, and some people might even say they sound better than a lower-end 10 or 12 inch subwoofer. In general, an 8-inch subwoofer will give you nice, cheap, clean bass.
What size subwoofer hits hardest?
If you buy a subwoofer with a 15-inch diameter, it will be the most powerful. It's because they are so big that they will have the deepest bass.
Are dual 8 inch subwoofers good?
They go together very well. You should buy these dual 8-inch speakers if you want to hear good, deep bass sounds "subs with the box. As other people have said, these 8" subs sound more like good 10" subs.
More Articles

Best Klipsch Bookshelf Speaker

How to Connect Bookshelf Speakers to PC

What Need to Know About DTS Sound

Best Dolby Atmos Home Theater System

Best Cable Amplifier

Best Portable Speaker For Dance Class
ADVANCE COMPARE ENGINE
Select Two Audio / Video System for Detailed Comparison
ADVANCE SEARCH ENGINE
Find Your Sound System by Any Desire Specification